

How To Set Up A Manger Scene
Quick Links

Villages Display Techniques
Tips:
Designing a Christmas village display is an expression of individual taste that requires imagination, planning, thoughtful selection, and a basic understanding of manner concepts. The about eye-catching displays are visually balanced, offering a contrast of shapes, texture, and color.
New Christmas village (and Halloween hamlet) collections are created each yr, so not only can yous make a fine fix, but y'all can proceed to add together to information technology year afterwards year.
Location:
Preferably, you lot should choose a primal spot of your business firm for your village location, where information technology can exist easily seen by family and guests. Express space should not limit your aspirations to create an attractive display. Consider some of these location ideas:
- In a wreath
- On a mantel
- In a bookcase
- In a bay window
- Upwards a staircase
- On superlative of the piano
- Inside a roll-tiptop desk
- Every bit a centerpiece in the dining room
- Under the Christmas tree
Virtually villages have at least a few elements that need to be plugged in, so y'all will want to make certain yous are close to an outlet. Yous may also need a multiple outlet extension cord.
Layout:
Make a pattern or layout of how you desire to adapt your display. One idea is to create a town foursquare, using a miniature tree as a hamlet centerpiece, and plan your village effectually it. This will give the true impression of a Christmas hamlet.
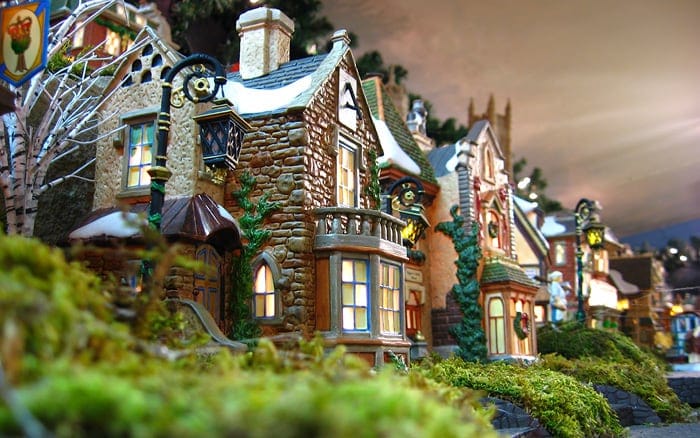
Have a look at the details of your village buildings. Some have sides, porches, or doorways that you may desire to feature. Buildings can be set diagonally to feature details which might exist subconscious if the buildings are placed in a directly row.
Place the buildings on a piece of paper or poster board and trace the outline of their bases. Make certain non to use a permanent marker in case you accidentally bear on the buildings. Label each outline with the name of the corresponding village piece. Consider the placement of your mountains, ponds, roadways and large accessories.
The Base:
Create a base for your brandish. If you would like to stagger the height of buildings, consider adding small boxes to the surface equally stands, to create hills. The advent of these boxes will not matter, as they volition non be visible once the setup is finished. Placing a 2nd, lower table in front of the first likewise works for creating elevations, or a slope.
A good idea is to cover your base with a white textile. This covers the boxes and creates a single, staggered surface. A good trick is to add a strand of clear lights, randomly positioned under the cloth. This creates an illusion of brilliant and sparkling snow on the ground of your hamlet. (Ringlet downwards, or click here for detailed instructions on creating a base).
Backdrop:
An backdrop for your display will create a "finished" look. You can paint a cute cloud-filled sky, a mount range, big urban center skyscrapers, or a woods of evergreen trees yourself. You tin create a dramatic waterfall in a mountain scene, or a skating swimming in a winter scene. If your village feels small, placing a mirror behind information technology tin make the scene appear bigger.
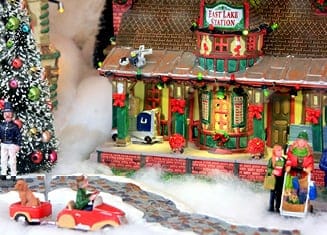
The Buildings:
After y'all've created a base and backdrop, it's time to add your buildings. Make sure that you do non place them too closely together. For buildings with plug in lights, apply cotton or the base of operations textile to cover up the cords.
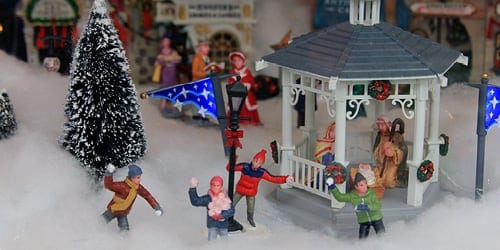
Accessories:
Don't forget to add people, snowmen, and other accessories! A mixture of trees can add ambiance and a sense of realism to any display. Fences, walls and copse can too be used to add privacy and beauty to each home, or can exist used to separate gardens and areas of piece of work and recreation. Consider the architecture of your buildings and where you plan to identify the boundaries.
Add actress amuse to your display with interesting roads, paths and walkways. Materials should be chosen for their interesting texture or color. Sawdust or straw can be used as a basis cover near farm buildings, while small stones piece of work well for quaint country roads.
For a finishing bear on, think about using spray-on snow on the branches of the tree, or placing handfuls of cotton around the base, for a feeling of deep snow. Faux snow can be sprinkled on the entire set, or white glitter can be applied lightly for a beautiful bear on. Yous tin also hang tiny snowflakes from the ceiling above the village, or comprehend the wall behind the hamlet with them.
Creating a Base of operations
Materials for Big Village Base of operations (iv ft ten viii ft):
- Styrofoam sheets
- Plywood
- Wallboard saw/electric cream cutter/sharp utility knife
- Wire brush
Instructions:
- Offset with eight sheets 4 ft x 8 ft white Styrofoam. 6 of the sheets should exist 2" thick, ane sail one 1⁄2" thick, and 1 sheet 3⁄iv" thick.
- Stack 2 of the 2" Styrofoam sheets on top of plywood.
- Cut a six" 10 xiv" rectangle in both layers to create a 4" cavity.
- Use 2 3-Prong power strips in cavity. Plug Air-conditioning/DC and Adapters into the power strips.
- With a hot wire or sharp utility pocketknife, cut a variety of levels with the rest of the Styrofoam to create elevations.
- Wooden skewers are ideal to keep levels in place.
- Place houses as desired and light with 6 or twenty socket light sets.
- Place accessories and landscaping to complete the display.
Making a Small or Medium Base:
- Cut a free form or traced piece of white Styrofoam to fit a specific expanse such equally the meridian of a hutch or sofa table, a wall or table fixture, or a handbasket or tray for centerpieces.
- Cut a cavity to hibernate electrical cords or constrict them under foam.
- With a hot wire or sharp utility knife, cutting a variety of levels with the rest of the Styrofoam to create elevations.
- Utilise wooden skewers to continue levels in place.
- Place houses as desired and lite with six socket light sets.
- Employ accessories and landscaping to complete the brandish.
Setting Up a Nativity Scene
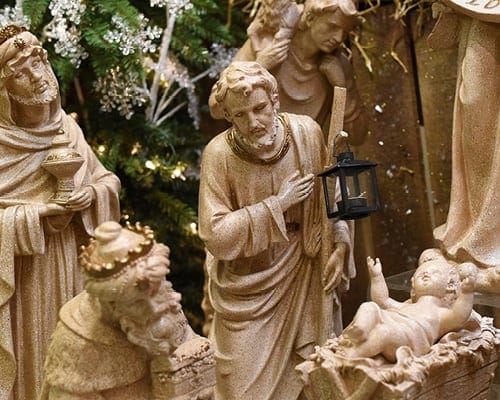
Most nativity scenes are set in a traditional organisation, therefore there is a elementary procedure in order to set one upwards in the proper way. No matter the style or calibration, it is likely that there are some universal themes, so check for these first when planning your decoration.
First, find a suitable table with ample space on it for your desired scene. Then place your table somewhere where in that location will exist a minimal hazard of it being disturbed or bumped into.
The center effigy of the nativity set up is, of form, the baby Jesus. Some traditions suggest leaving the manger crib empty until Christmas; this is a personal selection. In either case, this figure must be in the eye. Mary will be the closest figure to baby Jesus, looking down at the manger. Joseph is typically placed in the center too, though many put him farther away, depending on if the figure is looking downwards or not.
After the main family has been placed, it is a thing of slowly expanding backwards and outwards. Commonly no other human figures are placed in the stable itself. The shepherd figures are the next closest, with the wise men placed just beyond them. Any angels or animals can be liberally scattered effectually the scene where needed, though often you will come across sheep near the shepherds and camels with the wise men.
Some sets come with a specific angel effigy that is meant to be hung. Information technology is usually hung from the top of the stable, to hover over the unabridged setting.
And with that, your scene is fully and properly set upward. If you have children, consider letting them assistance set up up the scene as office of a story, adding characters are they are mentioned, peradventure starting a lovely new Christmas tradition.
Source: https://www.christmascentral.com/resources/villages-and-nativity-scenes/
0 Response to "How To Set Up A Manger Scene"
Post a Comment